How to Paint IKEA Furniture (so it actually lasts!)
This post may contain affiliate links · This blog generates income via ads
This post may contain affiliate links · This blog generates income via ads.
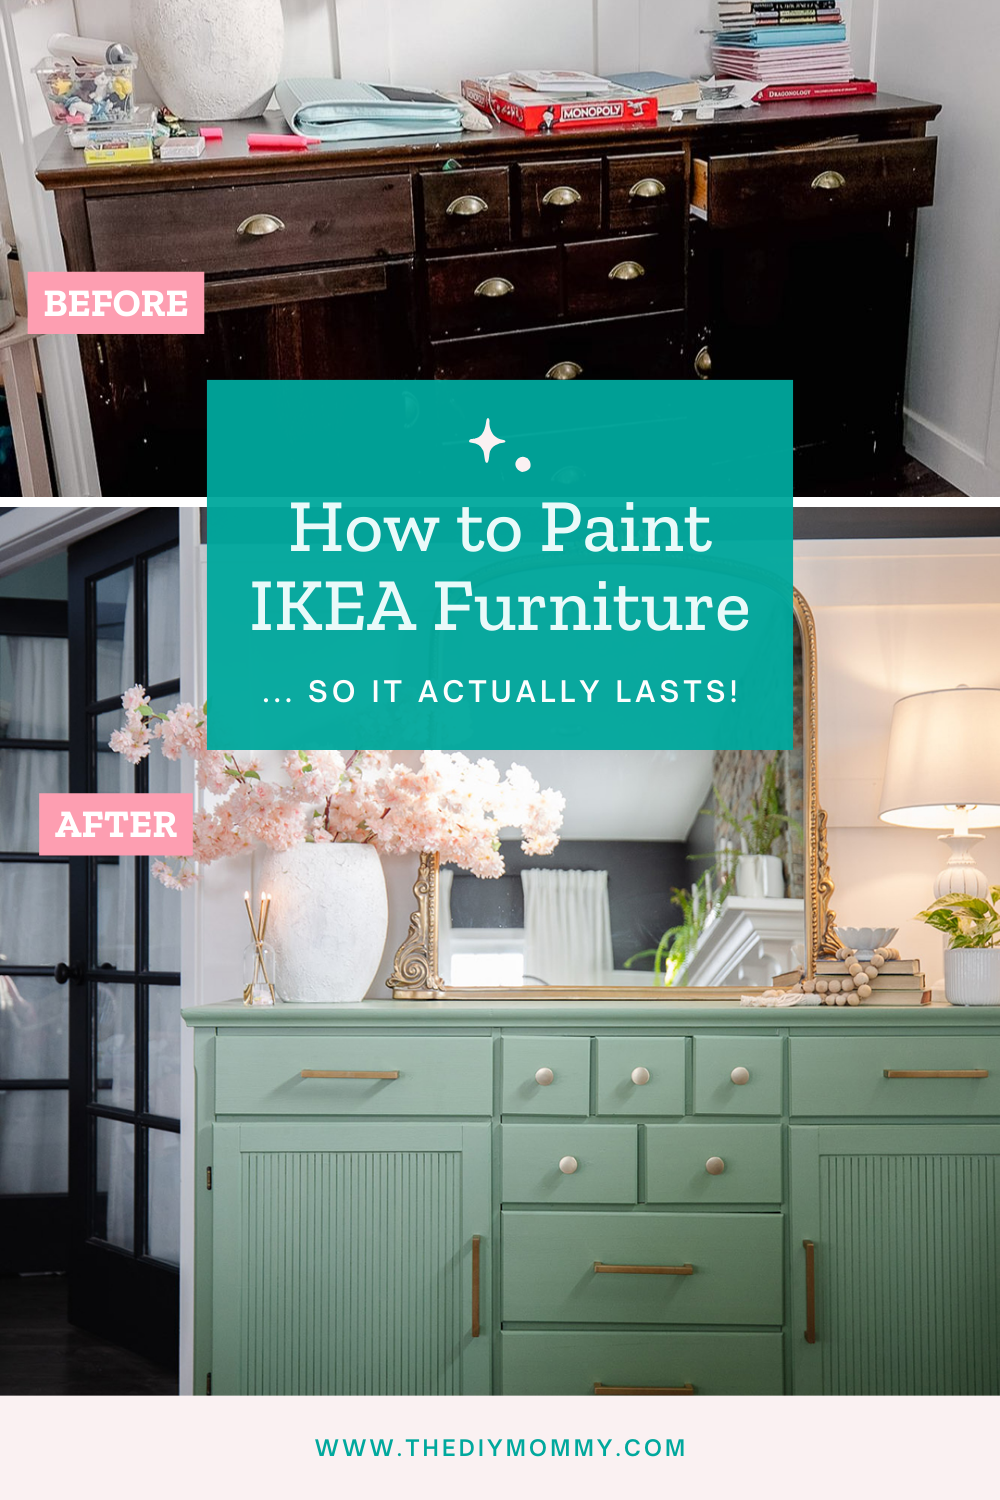
Are you thinking of painting a piece of IKEA furniture, but you aren’t sure where to start? Maybe, you’re wondering if it will hold up. I’m here to tell you that IKEA furniture can absolutely be painted if you use the right products and techniques. From identifying the best paint to my easy DIY tips — I’m showing you how to paint IKEA furniture for a custom look that will last!
As you all know, I love a good IKEA hack! My favourite way to make inexpensive IKEA pieces look more high-end is to give them a few coats of paint. I’ve painted many pieces of IKEA furniture over the years, so today I’m sharing all of my tips and tricks. I hope this helps and inspires you to grab a paint brush and get started on your own IKEA project piece!
Watch my video on painting IKEA furniture
Can IKEA furniture be painted?
You might be wondering at this point if IKEA furniture can even be painted at all. The answer is yes! Whether it’s a piece made from solid wood or particle board, IKEA furniture can definitely be painted. You just need the right prep and materials for each project you undertake. Even though most IKEA furniture painting projects involve a laminate surface that can be a bit tricky, all my projects look great and have lasted for many years with no chipping, peeling or flaking. You might be surprised at the durability of a painted IKEA piece if you take the time to do it the right way!
How do you prep the furniture for paint?
The first and most important step for best results with a painting project like this is properly preparing the surface that you want to paint. The right prep work can make or break your painted furniture piece. I find that most people who complain that the paint didn’t stick properly to their laminate IKEA furniture did not do this step properly. It’s definitely a bit fiddly and time-consuming to properly prepare your surface. It’s also not as fun as the painting step. But it makes such a huge difference to how your paint job holds up in the end that I would say it’s more than just a good idea. It’s absolutely essential!
Can I just paint over IKEA furniture?
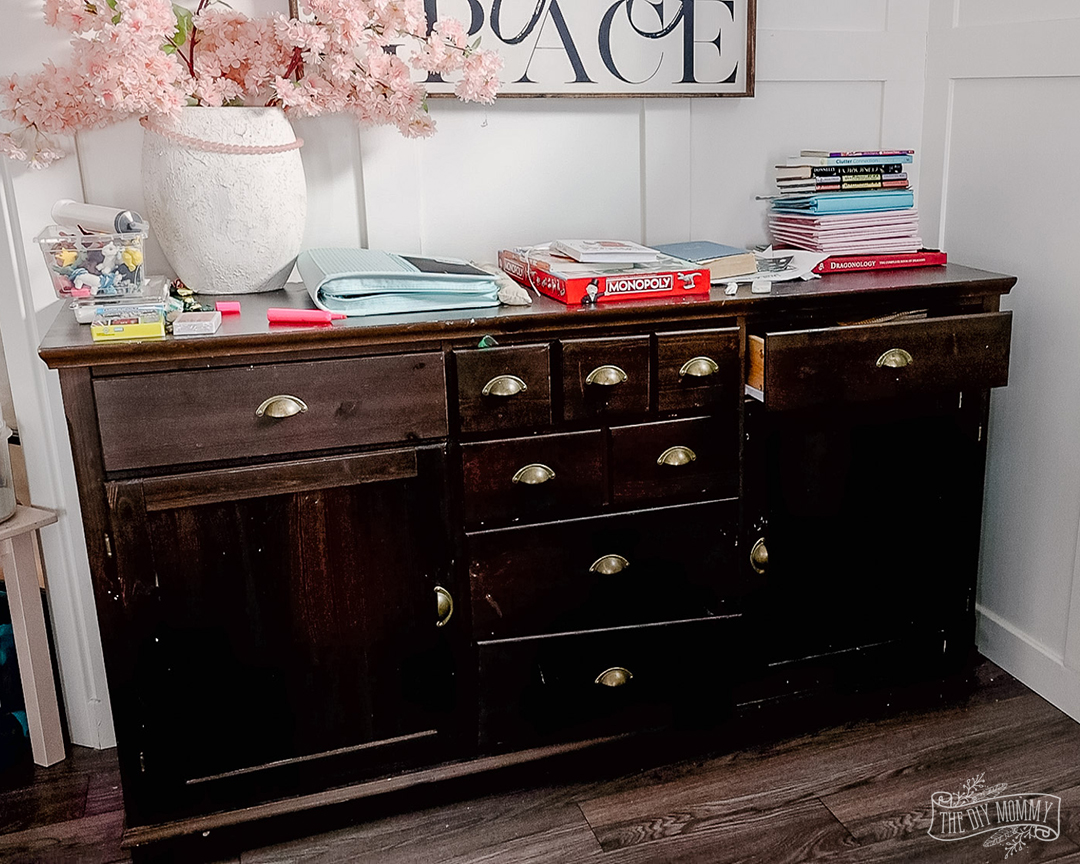
Yes! You can start with existing IKEA furniture that is already assembled and paint it as-is. To begin, remove the drawers from your assembled piece so that you can paint the drawers and frame separately. Prep and paint all visible surfaces to give the impression that your furniture has always been this colour! You don’t want to move the desk away from the wall and realize you forgot to paint the back of it, for example. Remember that it is worth the hassle of painting pre-assembled furniture because this is often the cheapest option. You can shop rooms in your own house, the as-is section of IKEA, thrift stores, or Kijiji for great pieces of furniture just begging to be turned into something fresh and new.
If you decide to buy something new and haven’t assembled it yet, you will have fewer paint-related headaches. Paint each piece before you put it together for a far easier process. If you are purchasing a piece of furniture specifically to paint it a new colour, you can be far more thorough and really ensure you paint every last nook and cranny. You will not have difficult corners or tight spaces to worry about like you would with pre-existing furniture. You trade this convenience for cost, since you will often have to pay the full retail price for your furniture.
IKEA furniture needs a light sand and a good cleaning before it’s painted
No matter whether you are starting with a new or used piece of furniture or what material it’s made of, I find that all IKEA furniture needs a light sand and a good cleaning before it’s painted. I recommend a good “scuff sand” sanding process. This is a sanding that will create a rough surface that the paint can more easily stick to. Scuff sanding is light enough that it doesn’t require power tools. This is especially good practice if your piece is not solid wood, since you don’t want to risk damaging it by sanding too harshly.
I suggest using a 100-grit sandpaper (or a medium-grit sandpaper) and sanding by hand. You can use a power sander if your surface material can take the force of a power tool. After sanding, use a damp cloth to remove any dust, dirt, or loose debris from the furniture. Finally, wipe the piece clean with a de-greasing cleaner to remove any oil or grime. Now your surface is prepped and ready for the next step!
What primer do you use?
Before you choose a primer, you need to determine if you even need to use one on your IKEA furniture painting project. A solid wood piece with a rougher texture doesn’t usually require a primer before the top coat of paint. This depends on the colour, of course. If you want to turn a piece of black furniture white you will need primer no matter what it is made of! You may also be able to skip the primer if you’re using a chalk-style paint like this one (but do a test swatch first).
If the furniture is a satin, semi-gloss, or glossy finish laminate, a good coat of primer is definitely required after the scuff sand step. This material is such a smooth surface that even after a good sanding, it still needs help before it will properly take paint. I like to use a bonding primer like this one. It’s nice and sticky and will adhere well to a piece that has a bit of gloss. Priming your furniture properly will ensure that the paint top coat won’t peel or chip.
Many of my fellow DIYers have reported that Zinsser primer works like a charm, but I’ve yet to try it! Some people even use a second coat of primer on their pieces. However, I’ve found that one coat of quality primer is enough. Even if it might be overkill, two coats of primer on a sanded clean surface would definitely make the paint stick!
It’s also important to let your primer cure properly before going on to the next step. Read the primer’s label to determine exactly how long you should wait before painting a top coat on your furniture. Don’t rush this step and undo all the hard work you have put in already! Waiting a few hours in between coats will be worth it in the end.
What paint do you use?
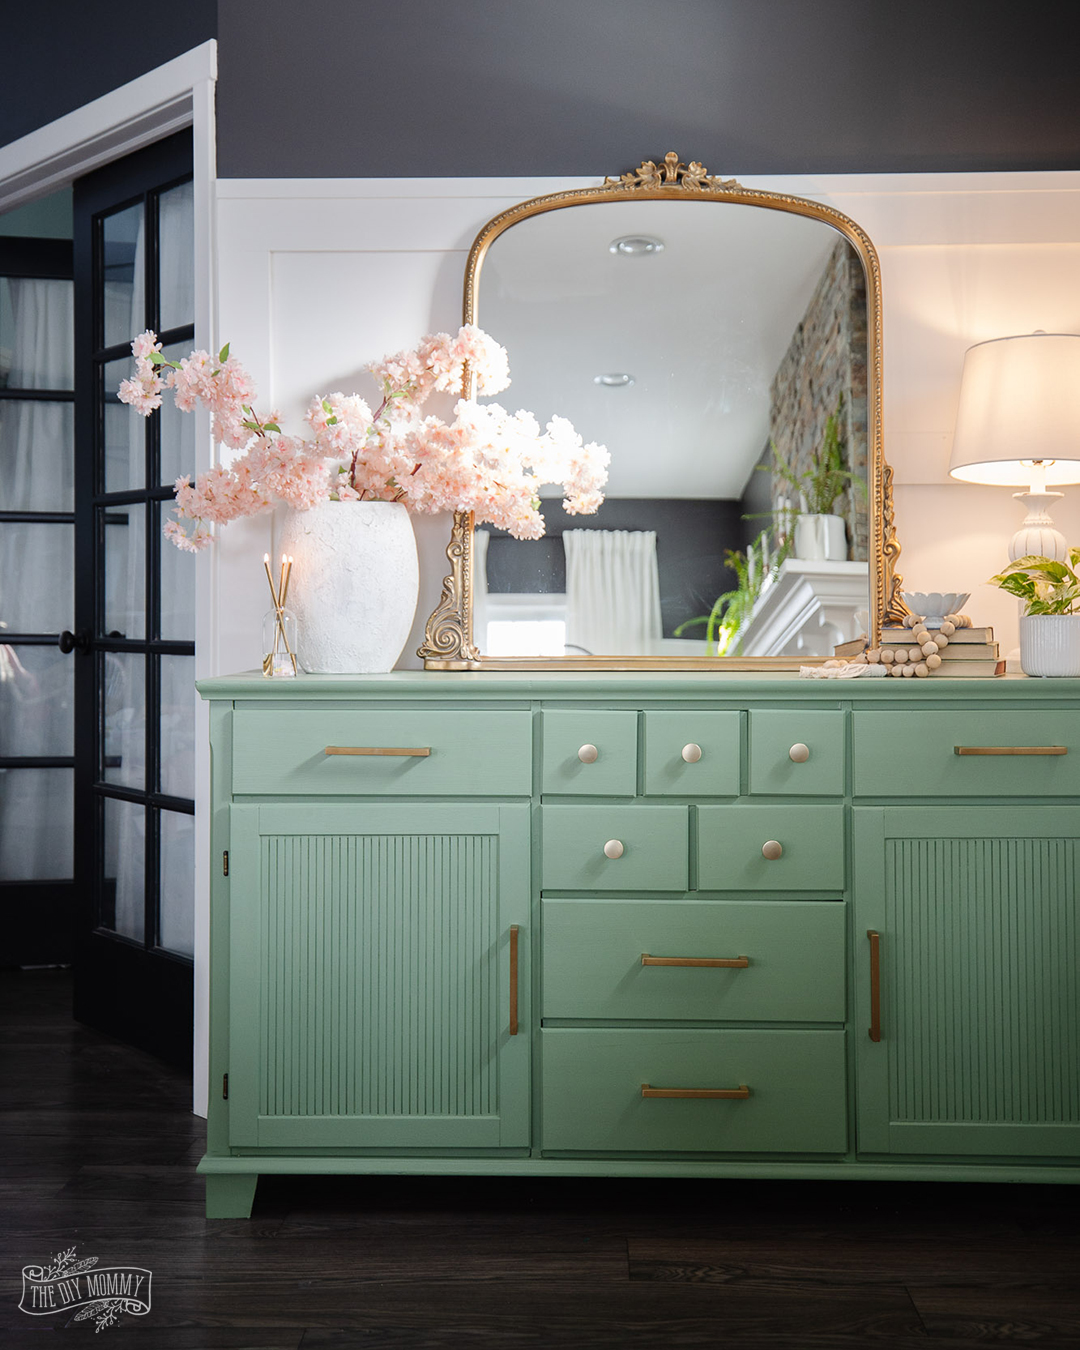
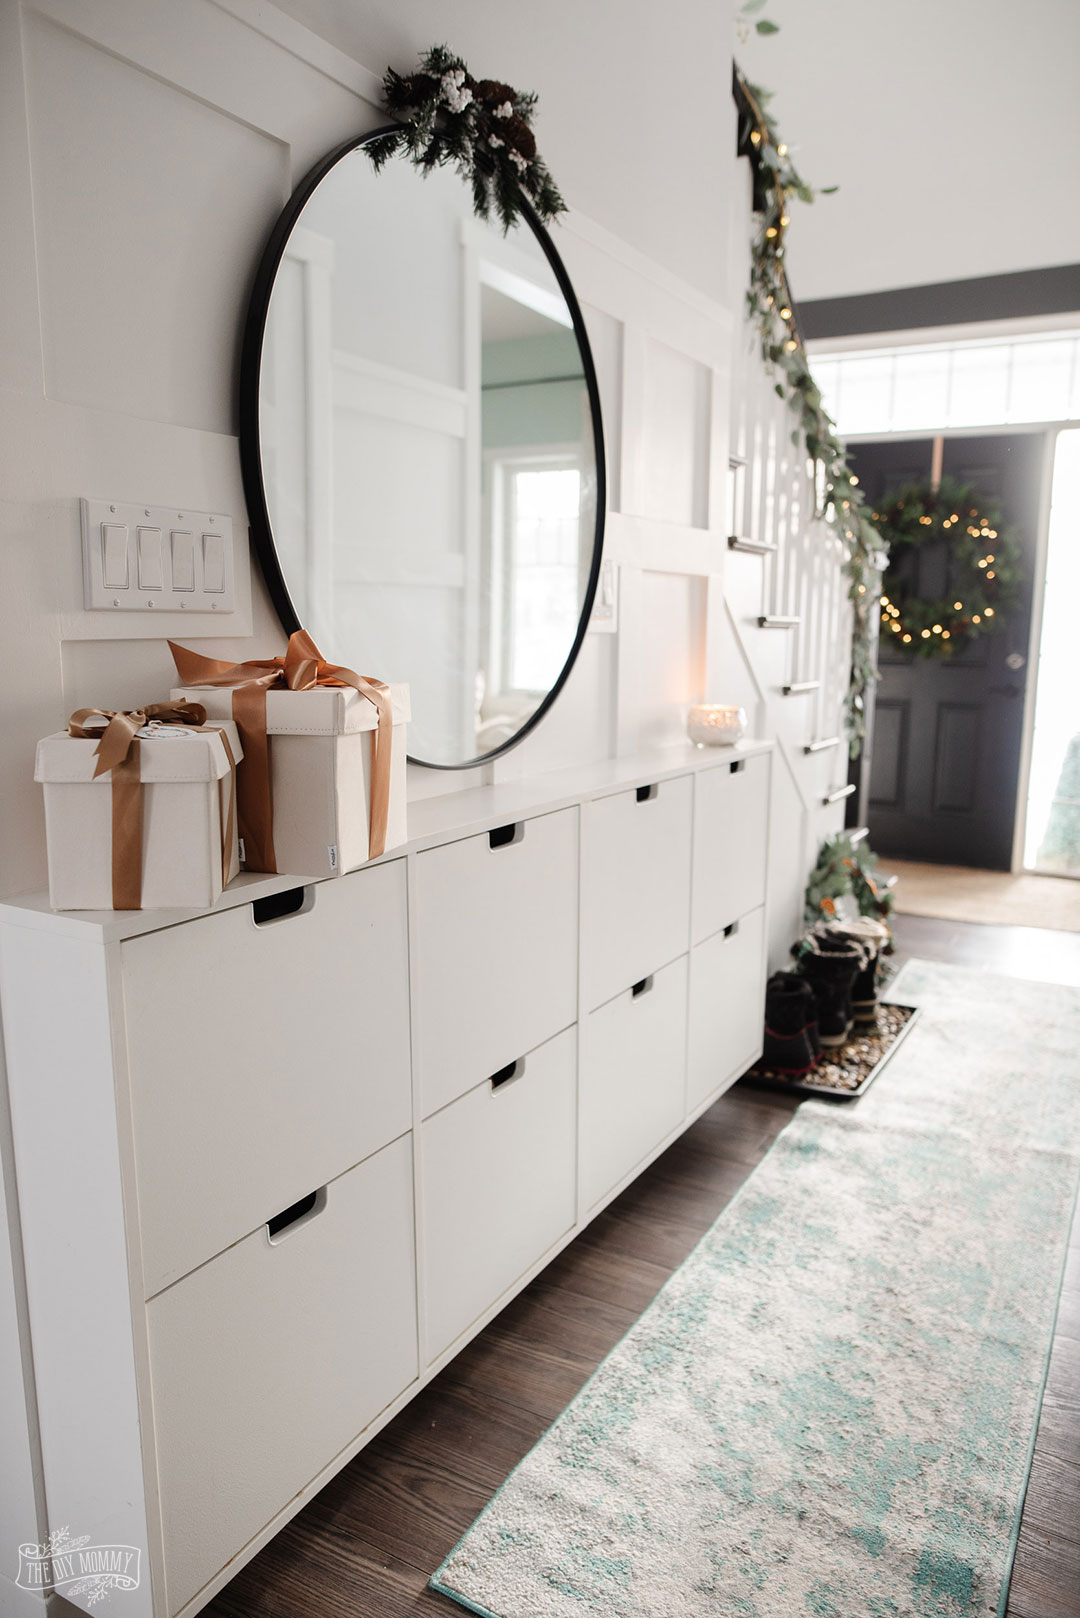
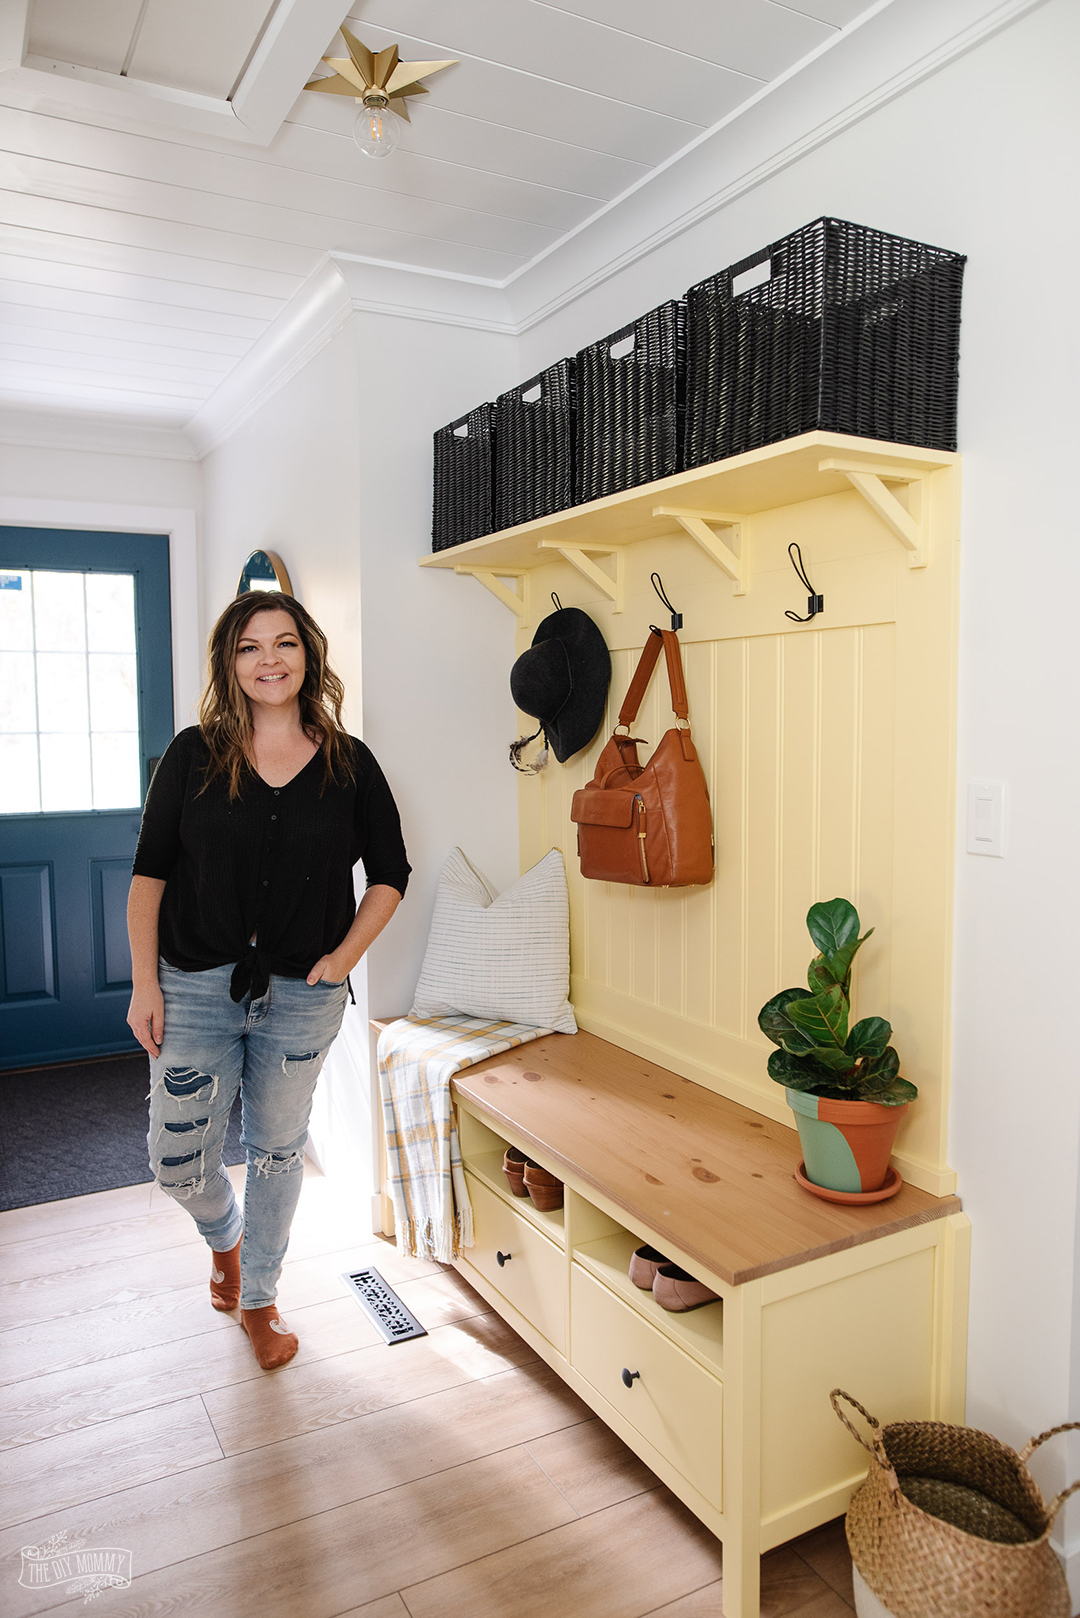
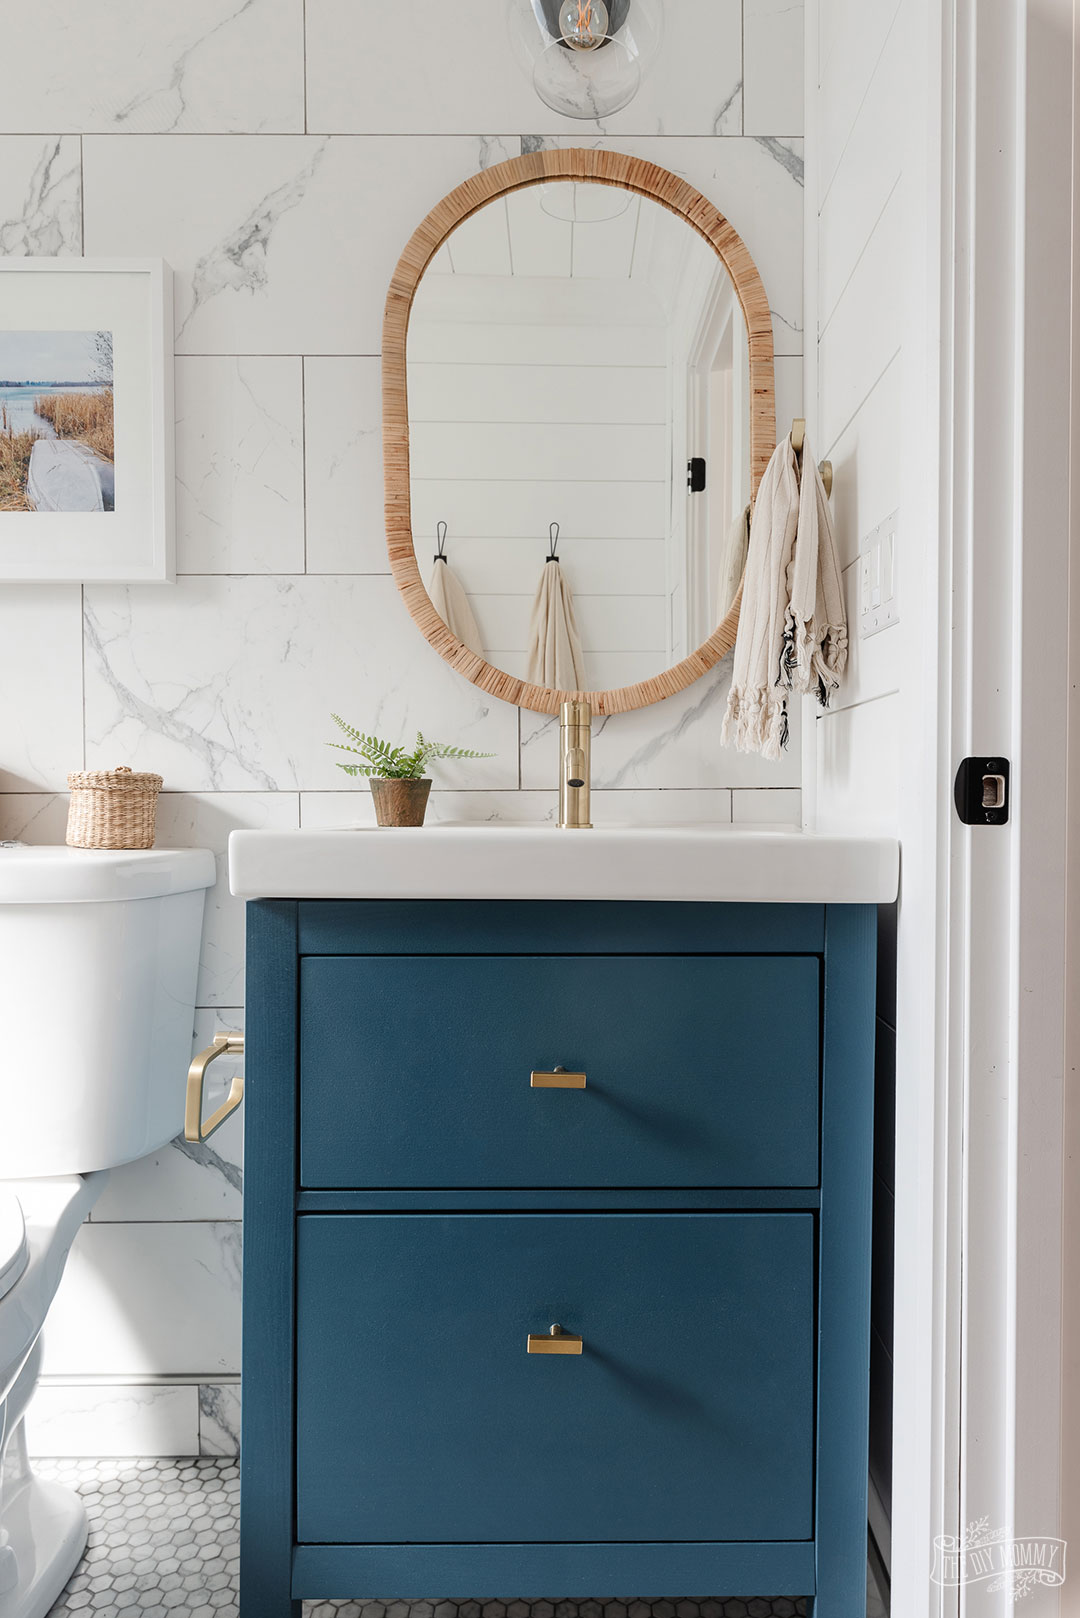
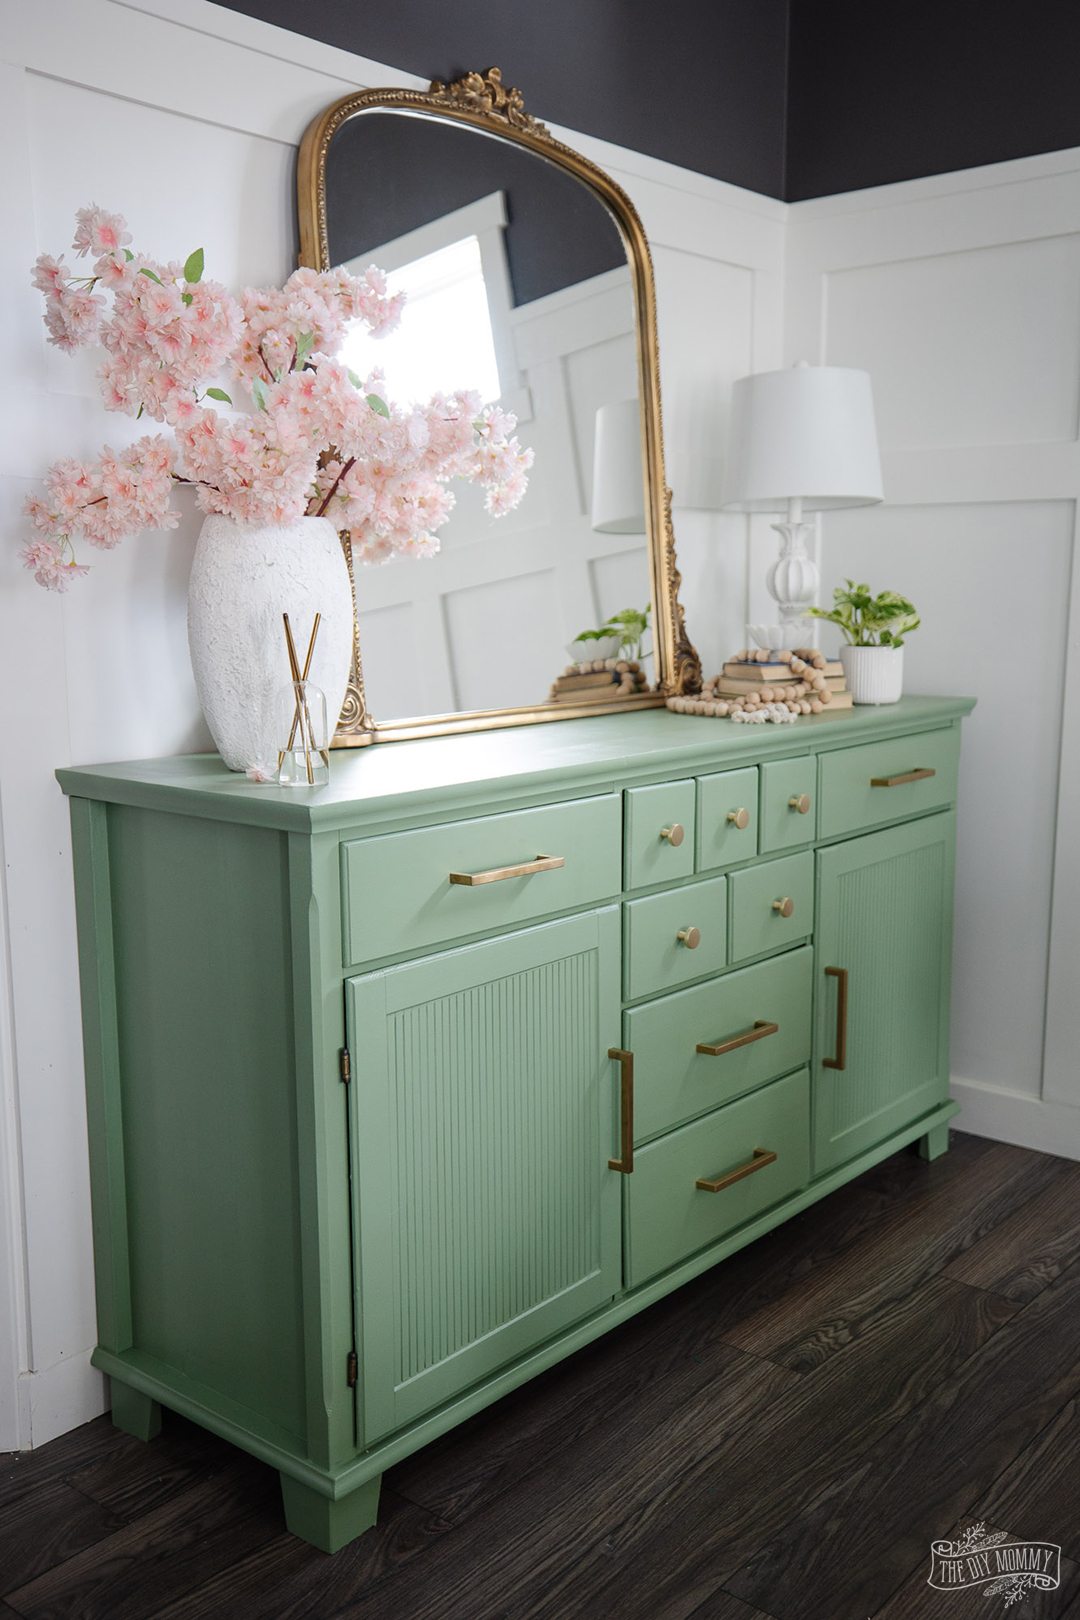
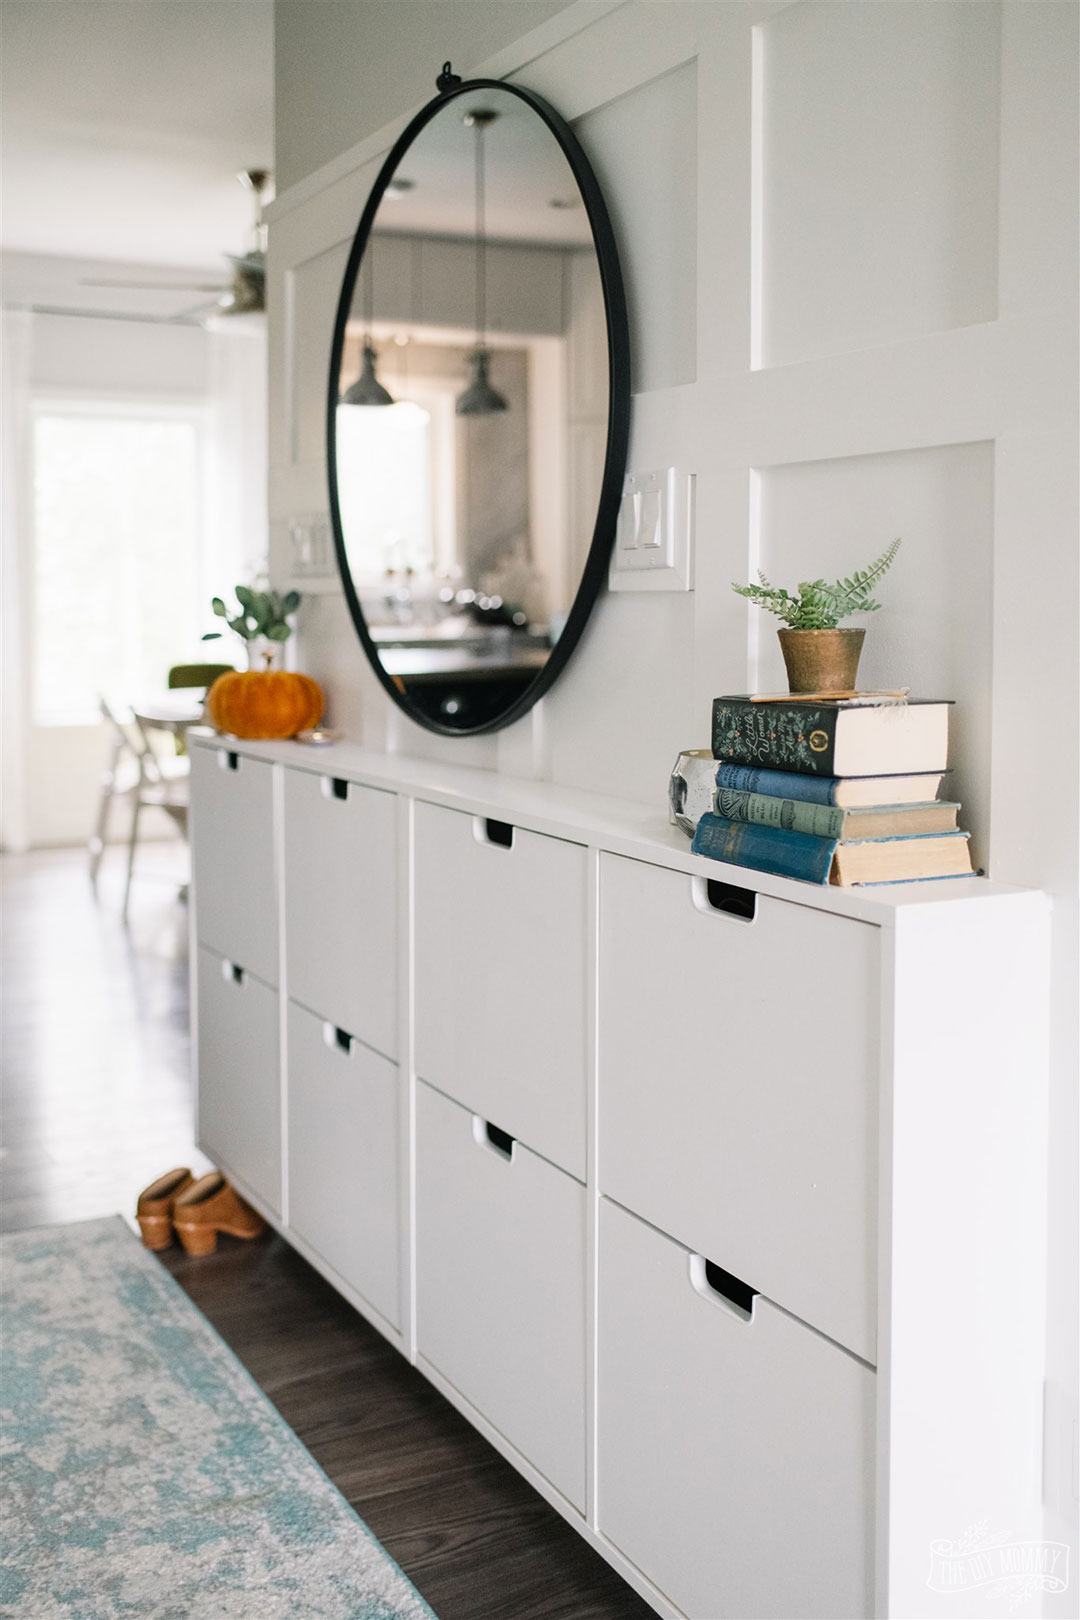
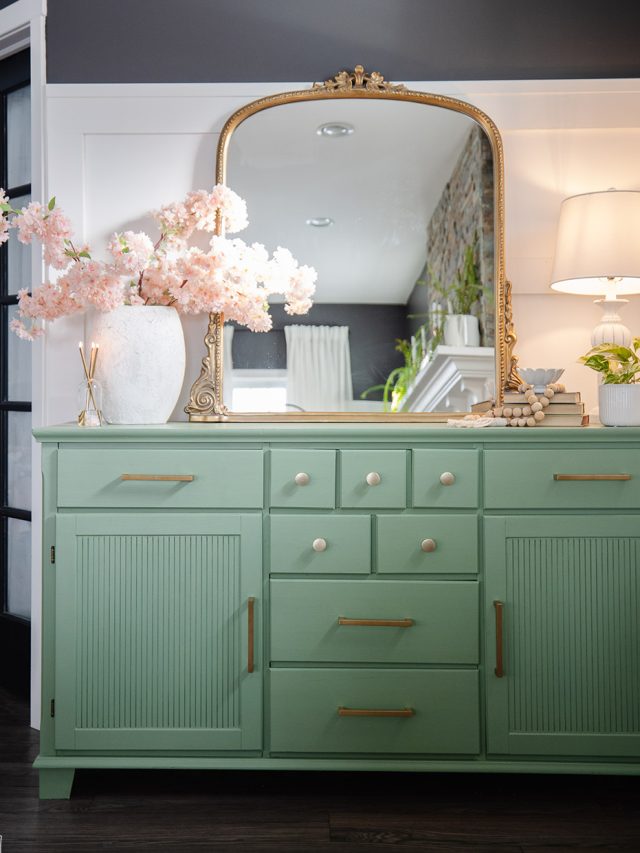
I’ve used a variety of different kinds of paint on my IKEA furniture DIYs. For example, you can really give your piece a brand new look by using chalk-style paint and distressing it Country or Farmhouse style. But my favourite paint to use is plain old interior latex paint! I used it to paint an IKEA TV stand when I created an entry bench in our Little Lake House. I’ve also used it for an old sideboard, a HEMNES bathroom vanity, and two STALL shoe cabinets in our entryway. I find it doesn’t require a top coat of sealant, and when combined with a good primer it lasts and lasts! The kind of paint you use is a case of personal preference in terms of look and final finish desired.
My favourite latex paint to use on IKEA furniture (solid wood or laminate) is Behr Scuff Defense or Behr Dynasty (even better). Both products have lasted on my pieces for a long time, and Dynasty has absolutely amazing coverage.
Chalk paint is also an option, but it’s harder to get a smooth finish with no brush strokes with this type of paint. For a more vintage, distressed look it would be perfect, though! When you’re choosing the type of paint to use, you need to think about your budget and the type of finish you want. But don’t overthink it either! Most types of paint will turn out beautifully.
Should I use paint rollers, paint brushes, or a paint sprayer?
My preference for painting furniture is to use a paint sprayer for the most even finish. My favourite paint sprayer is the Wagner Flexio 5000. A sprayer isn’t always affordable or easy to prep, though. If you’re not planning on painting furniture all the time I would understand not wanting to make this purchase. So, my second favourite tool for painting furniture is a foam roller. Foam rollers produce a decent finish without lines, drips, or stroke marks. You can then do any detail work with a good quality paintbrush.
I would like to emphasize that if you are planning on making furniture painting a regular part of your DIY life, a paint sprayer is a good investment that will save you time in the long run and give you the best finish possible. You could try renting one from Home Depot to try it out before you commit, or even if you just want to use it once! If you know other people who like to DIY, you could always see if you could borrow one too.
How do you paint IKEA laminate furniture? Wood furniture?
As I said before in the section on prepping, I find it’s absolutely essential to do the scuff sanding and priming steps when painting laminate furniture. If you skip these steps, you’ll probably find your paint peeling over time. For solid wood furniture with a matte finish, I’ve found I can skip the priming step and go right to the paint top coat! I did this on the green sideboard because it was made of solid pine that had a texture to it. While priming is sometimes optional, sanding is ALWAYS a must, no matter what material your base is.
Do you need to seal your piece of furniture?
In my opinion, sealing your new paint job isn’t necessary, especially if you are painting a piece that doesn’t see a lot of use (like a decorative desk or side table). I personally haven’t found sealing necessary when using primer and latex paint for my IKEA furniture. However, if you decide to paint with chalk paint you may want to seal it so that your surface is easier to clean, since chalk paint is not an easy to wipe option. For chalk-style paint, you can use something like this as a sealant. And, if your furniture could be considered a “high traffic area” like a desk chair or tabletop, sealing it might be best.
What are some IKEA hack ideas?
If you’ve reached this point in my post and you’re feeling excited about the possibility of transforming a boring piece of furniture from IKEA into something new and exciting, great! The DIY possibilities are endless when it comes to creating a custom-look piece of furniture from an IKEA find. I’ve done quite a few of these projects, so you can learn from my experience and get my full tutorials to get you started on your DIY painting journey. Here are some of my favourite painting projects that you could do too:
- Make a built-in look entry console from STALL shoe cabinets
- Create a dining bench from IKEA kitchen cabinets
- Do a mid-century modern BESTA hack
- Create a campaign style dresser from a MALM dresser
- Make a group of BILLY bookcases look like built-ins
- Hack some IKEA PAX units into a stunning walk-in closet
This is not a complete list of everything you could do with paint and IKEA furniture, but it should give you a good start! The more of these projects you do yourself the more ideas you will have and the easier it will become.
Watch my video on how I painted my old IKEA sideboard:
Remember when I said that solid wood doesn’t need a primer? Here’s an example! With this piece, I didn’t need to use a primer before the latex paint top coat. This sideboard was made of solid pine and didn’t have any sort of gloss to its finish. It’s holding up perfectly so far!
More IKEA hacks & decor ideas —>
I hope this post has answered the question of whether can you paint IKEA furniture or not! I also hope you found all this info helpful as you consider the fun paint DIY projects you could do with IKEA furniture. Let me know in the comments below if you’ve ever tried painting furniture and how it went for you.
Happy DIYing!
Pin Me!
What would use paint wise to paint kitchen cabinets? Latex like your furniture?
Thank you for sharing!
I could and do sit and read your blogs all day. You’ve got my head spinning with these great ideas, so now I just need to do it. Lol Thanks you.
Dear Christina,
I just discovered you on you-tube and I have been binge watching your videos. I am so glad I did. I love your work. You are helpful, inspiring and informative. Forgive me if you have posted this information somewhere but I haven’t found it. What is the green color of paint on the IKEA sideboard and the yellow color on the entry hall cabinet.
Thank you,
Diana
Thank you. The green is Laurel Tree and the yellow is Corn Stalk. Both are Behr paints.
Its good to know you use Behr successfully. I have been sticking to fusion mineral paints but Behr is much more affordable. Thanks for the advice, and the dresser is wonderful.
Hi! Do you happen to remember the name of the blue paint you used on that Hemnes bathroom vanity? Its gorgeous!
Thank you! The paint is Observatory by BEHR. You can read more about it here: https://thediymommy.com/modern-coastal-bathroom-renovation-on-a-budget-our-little-lake-house/
What sheen do you recommend when painting a tv console
What sheen would you recommend
Matte
Does painting textured wooden ikea furniture work well? I have the brown almost wood grain textured Billy bookcases and wanted to try painting them. Have you had any success paining this kind of item? Does it look good? Or is it better to replace them with the white smooth bookcases?
MDF can be painted with scuff sanding and a good primer first.
Hi Christina,
Loved your video. You offered us such great tips!
I’m forever painting IKEA furniture and finally wanted to know how to do it so it lasts and now I know, thanks to you!
Cheers,
Suzanne
P.S. Your style of decorating is beautiful!